
Navigating to the 3CX website
- To navigate to the 3CX website, open the welcome email. Example of Welcome email below.

In this email you will find the extension number, voicemail PIN and the web client link followed by your login details.
- Click the link Outside the office: https://kingsely.3cx.uk:5001/webclient for the 3CX website.
- Once the website has opened, there will be a request for your extension & password. These were located on your welcome email.
- After logging in you’ll see the various contact details in our phone system.
Installation and use of the Chrome Extension
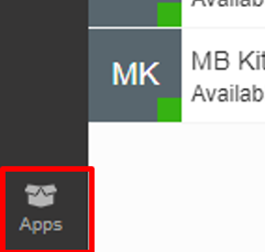
- To install the Chrome Extension, click the Apps button located at the bottom left of the webpage. Highlighted in red below.
- Click Chrome Browser Extension. This will open a Chrome web store page.
- Click the blue Add to Chrome button on the right of the Chrome web store. Highlighted in red

- After a small window will pop up. Click the Add extension
- Click the Jigsaw button in the top right of the Chrome Browser. Highlighted in Red
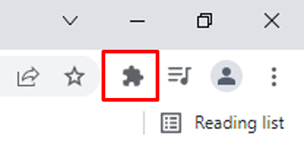
- A small drop-down menu will appear. Here you will find 3CX Click2Call. Click the 3 dots () to the right.
- Click Options.
- A window will pop up. You will find 2 options under the Which 3CX app to Launch: Click Web Client. Leave this open.
- Navigate back to the 3CX website. Copy the link. As shown below.

- Navigate back to the Extension. Paste the previously copied link into the text field below the Web Client Highlighted in Red below. Then close the Tab.
Installing the 3CX application
- While on the 3CX website, Click the 3 dots () in the top right corner.
- Click install 3CX. Highlighted in Red
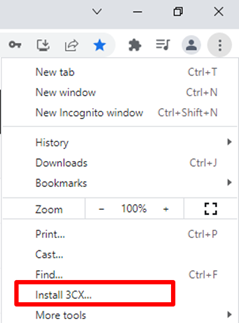
- A small popup will appear. Click blue install button.
The 3CX Web client application will once it’s installed. All options and features are the same as the Website but acts as it’s own application which can be pinned to your Task bar. Highlighted in Red below.
Installing the 3CX mobile application
This will allow you to call from and answer calls as if at your desk using the school’s phone system but from your mobile (the caller would not know you were calling from your mobile as it’s simply using the data on your mobile to access the 3CX system). Any numbers called using this method would not use your mobile’s calling plan minutes but would be dialed as if calling from your desk telephone. It would use your mobile’s data or Wi-Fi data service.
- Open your devices App store. Search for 3CX.
- Click Install.
- Once installed open the application. Read through and Agree to the User Agreement. Click Scan QR Code.
- On the 3CX web client click the Apps button located in the bottom left.
- Click on the option for your device either IOS or Android. Scan the following QR Code. Highlighted in Red below.
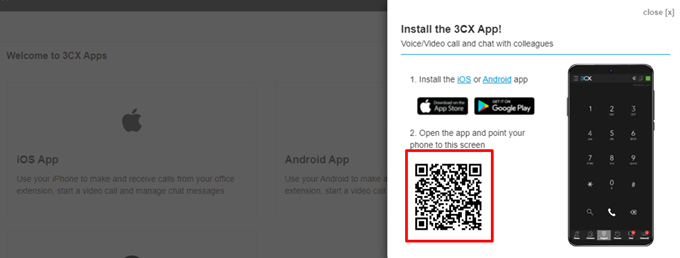
- The 3CX Application is now ready to be used. You can test the service by calling Echo.
Calling numbers from websites
Navigate to a website with a phone number you wish to call. Hover your cursor over the phone number. This will show a small text box stating Call followed by the number. Shown below. Clicking the number, you will be taken over to the web client/application where it will input the number into the dialer. Click the Green call button to ring the number.
Changing status and Call forwarding
- Click the profile picture in the top left. Highlighted in Red
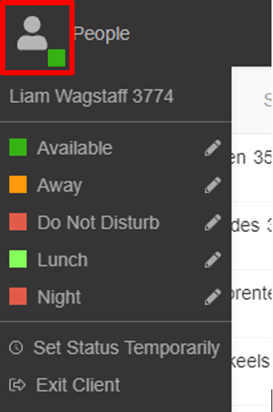
- From here you can quickly change your status. Also clicking the small pen icon beside the status will enable the user to create a custom status message which other can see. Underneath the status options you can set a status to be enabled temporarily for a custom amount of time.
- To edit each Status options, click the 3 dots on the left of 3CX. Navigate to Settings.
- Open Status. Here you can edit each status and setup call forwarding options for each status condition.
Change calling device
- On the 3CX website/application you can change the device which is used to receive and make calls. Click the 3 dots on the left underneath Panel.
- Click Settings.
- Navigate to Audio/Video. Under Call settings. You can change the option for Use this device for calls.
- You can change this to either a mobile device with the 3CX app installed, the 3CX website/application or a Yealink landline phone.
If making call from your computer or Laptop you can change the Audio settings used in the same area.
Contacts, Call History and Voicemail
- Call history can be found on the left of 3CX under Calls.
- Both Contacts and Voicemail can be found under the 3 dots on the left of 3CX.
Busy Lamp Field Settings & Greetings
- While on 3CX click the 3 dots on the left.
- Click Settings.
- Under the Status list of options, you can program how incoming calls are handled depending on your status. For example you can set unanswered incoming calls to be diverted to another number after a certain time or where to divert calls to if “at lunch” or “Away”, with the ability to handle internal calls differently to external incoming calls.
- Click the Greetings option located underneath Call Forwarding. Custom Greetings can be recorded to a file, uploaded, downloaded and tested for each status.
- Click BLF Settings located at the bottom of the list. Here you can setup which other extension numbers can be on your handset buttons either side of the small LCD display. These numbers can either be used as quick dial numbers or can be used to answer calls coming to those numbers (useful if you cover for colleagues/take each other's calls within a team or if you use two offices). The buttons can also be set to change your status to “Away”, “Available”, etc. There are many possibilities of what the buttons can be used for under this BLF settings area. If there are not enough BLF buttons you can add more using the + Add more BLF’s button, this will create a scroll feature on your handset to move to another “page” of buttons.